Archives

Using a Pressure Canner

Using a Pressure Canner

I was recently given several pounds of carrots. Most people would scratch their heads and wonder what in the world they were gonna do with more than 6 pounds of carrots! If you have a pressure cooker/canner you can very easily store them for later. Which is what I did.

IMG_20130710_121443

I also have been getting quite a lot of snap beans (green beans) from my kitchen garden. I planted a mix of wax, green, and purple beans. Aren’t they pretty? I never tried the purple ones before this year. I was amazed to find out than when cooked they look just like any other green bean. 🙂 Since I don’t really want to have green beans every night of the week, and I don’t want all of my efforts in the garden to go to waste, I can them for later use. It’s really very easy to do. You only need a few items: jars, lids and rims, salt, canning tongs, and your pressure cooker/canner.

IMG_20130712_143431

1. Wash the beans and snap off the stems/ends if you like. I usually snap them in half too, but you can process them whole as well if that’s your preference.

IMG_20130712_143802
2. Put them into clean, sterilized jars. I am using pint jars today. Be sure to really pack them in as tight as you can!

IMG_20130712_145105
3. Add 1/2 tsp. of salt to each pint or 1 tsp. per quart.
4. Add hot water to each jar leaving 1″ of head space at the top. Then, use a slim rubber spatula to gently remove air pockets from the jars. Add more water if you need to.
5. Wipe the rims of the jars with a damp cloth. This step is important! If the rims are not clean, your jars may not seal properly.
6. Put the lids/rims on the jars. Do not over tighten them, just close them like you would a jar of mayonnaise.
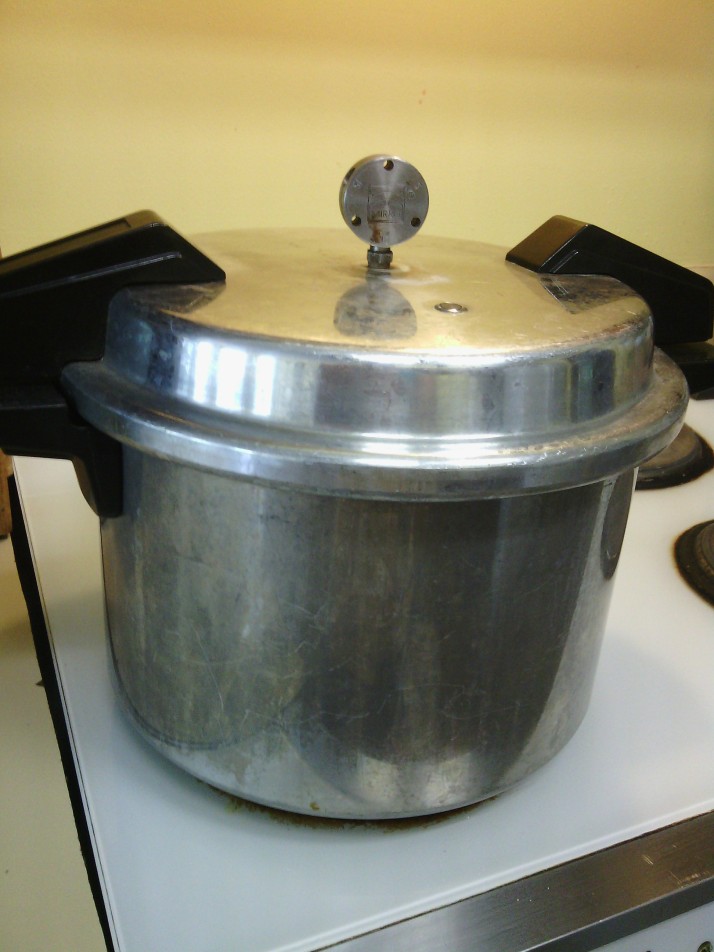
7. Load the jars into your canner with water coming up about 1/4 way on the jars. Close the canner and follow the manufacturer’s instructions to use it.

IMG_20130712_143453
8. I add the weight for 10 pounds of pressure and wait for the canner to start making it’s jiggling noises. That’s when you start counting the processing time. For green beans you process them for 20 minutes in pint jars, 25 in quart jars.
9. When the processing time is up, turn the heat off and wait for the canner to cool down. This takes awhile…mine sometimes takes about 40 minutes to an hour to cool enough. When it’s cool, remove the weight and lid from the canner carefully. Let it stand open for about 10 minutes, and then remove the jars to a towel with the canning tongs.
10. After your jars have sat for 12-24 hours, remove the rims, wipe the jars, and mark the lids with the contents and date. Store them in a cool, dark place until you’re ready to use them.

IMG_20130712_145518

Canning and Preserving 101

If you have ever wanted to try canning/preserving your own food but were afraid to mess something up and give everyone food poisoning…then this post is for you. Canning is actually pretty easy to do. I’m going to show you how to process using the boiling water bath (bbb) method. This method is only suitable for preserving pickled foods, jams/jellies, tomatoes, and other foods with a high acid content. If you want to can other types of vegetables you will need to process them in the pressure canner, which I will show you how to do in a future post. 🙂 To start you will need to make sure you have a few supplies on hand. I will need some canning jars, lids, rims, a funnel, canning tongs, and a large pot. I will also use a dutch oven to cook the jam in.

Today I am making a batch of strawberry-kiwi jam. YUMMY! I got this recipe out of the Ball Blue Book Guide to Home Canning, Freezing, and Dehydration. This book is a great resource for putting up food. It also gives very nice illustrated directions for exactly what to do each step of the way. It’s available a lot of places that you find canning supplies. I picked this one up at Wal-mart years ago, and I just recently got a newer version with my sister-in-law at Wal-mart again. (I’m not endorsing Wal-mart in any way…I’m just letting you know where I got the book.) Here is the recipe as it is in the book. I am going to adapt this ever so slightly.

Guide to Home Canning, Freezing & Dehydration

Guide to Home Canning, Freezing & Dehydration

Strawberry-Kiwi Jam

3 cups crushed strawberries

3 kiwi, peeled and diced

1 Tablespoon lemon juice

1 Tablespoon minced crystallized ginger

1 package powdered pectin

5 cups sugar

Combine strawberries, kiwi, lemon juice, ginger and pectin in a large saucepot. Bring to a boil, stirring frequently. Add sugar, stirring until dissolved. Return to a rolling boil. Boil hard 1 minute, stirring constantly. Remove from heat. Skim foam if necessary. Ladle hot jam into hot jars, leaving 1/4 inch headspace. Adjust two-piece caps. Process 10 minutes in a boiling-water canner. Yield: about 6 half-pints.

1.   Get water boiling in your canner. I put my jars, lids, and rims in to sterilize while I do this.

IMG_20130710_104806

2.   Gather all of your ingredients. I am using liquid pectin today instead of the powdered. I am also doubling the recipe above, so there is a lot more strawberries and kiwi pictured. 🙂 If you have never used crystallized ginger, I found it in the Asian section at Publix. It really is worth putting in the jam. It comes in little disks of ginger covered in sugar. Just slice and dice them as fine as you can. One or two pieces is equal to about a Tablespoon. I have used fresh lemon, bottle lemon juice, and substituted a little fruit fresh for the lemon in the recipe. Today I happen to have fresh. Another thing to note…my strawberries are pretty ripe. This is going to cause my jam to be more soft set. If you prefer a firmer set to your jam, use fruit that it less ripe. (The olive oil happened to be in the back ground…it is not a part of this recipe.)

IMG_20130710_105650

3. I put the sugar and ginger in my pot first, then I chop the strawberries and kiwi up and add them on top as I go. Finally I put the liquid pectin in.IMG_20130710_112813

4. I gently stir the mixture until it starts to melt over medium high heat. Then, when the sugar is melted, before it comes to a boil I use a potato masher to crush the fruit.

IMG_20130710_1137065. After you have let it come to a rolling boil, while stirring the whole time, you take it off of the heat immediately. You should gently scoop the pink foam off of the top. Your jam is ready to put into the jars when you see more red than pink foam.

6. Use a funnel and ladle the hot jam into your hot jars. I use the bottom of my funnel as a guide for how high to go. Leave a 1/4″ head space.

7. It is very important to wipe the rims of your jars with a damp cloth before you put the lids on. It helps to seal the jars properly.

8. Carefully put the jars into your boiling water canner. Hopefully the water is boiling by now. You can’t start timing the batch until it is boiling. Since I used pint jars instead of half pints, I added 5 minutes to my processing time. (15 minutes).

IMG_20130710_114511 IMG_20130710_114903 IMG_20130710_115012 IMG_20130710_115350 IMG_20130710_115553 IMG_20130710_121417

9. When the jars are ready to come out of the canner, use the tongs to set them on a folded towel to cool. Listen for them to “pop”. This means that they are sealed. 🙂

10. Let the jam cool for 12-24 hours. Remove the rings. Wipe the jars off with a damp cloth and use a sharpie to label the jam with the date and type of jam on the lid. Store them in cool dark place.